Pages

Monday, August 22, 2016

New Beginnings


Tomorrow I'll start my 18th year of teaching at a brand new school.  I'm THE math teacher at Burleson Collegiate High School in Burleson, Texas.  We will have 76 students in our inaugural class of Collegiate Panthers.  Go Green, Black and Silver!  Here's a peak into my new classroom.  I love love love the student desks that we have!  So many different ways to arrange them!  And I'm thrilled to have such a huge space and two big windows in my room!  It's been a long time since I had natural light in my classroom.  You'll notice that there's lots in my room that came from Sarah over at Math=Love.  She is the QUEEN of posters for the Math Classroom and much of what hangs on my walls came from her!


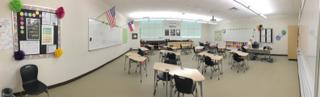
Starting the year off in pairs, but these desks are so easy to rearrange and there's so many different ways they can be configured!


Class information and the calendars where I'll post the assignment each day.  I'll also hang a vertical file next to the calendars where absent students can find copies of the work they missed.


I got this from Sarah and I love it!  I hung next to the whiteboard at the front of my room to remind me as much as my students that this is the philosophy in my classroom!


My desk area.  If I had one complaint, it would be that this really cool looking desk has ZERO drawers in it.  So I'm either going to learn how to do with less or it's going to end up being a mess!


I think I got these from Sarah as well?  I'm not sure.  I've had them for awhile.  But I love them!


I made my own version of an ABC's of Algebra that I saw on TPT.  I can't bring myself to pay for something if I think I can fairly easily make it myself.  I'm happy with how this turned out!


I give my students a growth mindset assessment the first day of school and spend a lot of trying to help them develop a growth mindset during the year.  If you guessed that these posters came from Sarah, you're right!


Love all this storage at the back of my classroom!


I zip-tied these pencil pouches to each desk.  It gives me a place to store A-B-C-D cards and Thinking Frames for each of my students.  I also plan on making students put their cell phones in these pouches, especially during assessments!


Here are the A-B-C-D cards and Thinking Frames that are in the pencil pouches on each desk.


A reminder of some of my students from my last school.  These are from the Top 10% Banquet that was held each year.  The seniors in the top 10% chose an teacher who had a positive impact them to honor at the banquet and they wrote something about you.  Definitely a highlight each year!

Friday, June 24, 2016

Centers in High School Math?

I recently took a position at an Early College High School that is opening in my town.  I'll be the only math teacher the first year, and I'll be teaching Algebra 1 and Geometry.  Right now we're set to have about 70 freshmen next year and we'll add a class each year for the next three years.
With this new beginning comes renewed excitement and creativity.  I look forward to the fresh start that this opportunity provides!  One of the things I want to implement next year is centers, like what they have in elementary room classrooms.  Here's a rough description of how I picture this working.

I plan on returning to my flipped classroom.  So when students come to class, we'll do a quick debriefing of the video.  Then I'll have them complete a google form to pick which 3-4 centers they want to visit they day.  There's an add on for Google Forms called Choice Eliminator that will let me set how many students are allowed to choose a center during each rotation before the center is "full" and they have to choose something else.  If they didn't watch the video the night before, then one of the centers they'll need to sign up for is "Watch Flip Video", so hopefully this will encourage them to watch the video at home since they'll sacrifice a "fun" center in order to catch up.

Here's a list of ideas I've come up with for different centers I can use.  I obviously won't offer every option every day, but I can offer choices that are appropriate for the concept.


Review (over old concepts)
Activity (with partner or in group)
Explain (create GIF, video, infographic, etc. over concept)
One-on-one with teacher
Watch Flip video
Practice (solo) (worksheet, Kahoot!, Quizizz, Quizlet)
Games
Math Art
Math Music
Reading (Joy of X, Math-themed books, articles)
Desmos/Geogebra
Engineering/Robotics challenge
Programming/Coding challenge

Some centers might be required on certain days, or they may be required to choose between two, like "Practice" or "Activity" (working alone or with a partner or group).

At the end of class, we'd come back together for a closing question where I can use the "My Favorite No" activity to clear up any lingering misconceptions and to assess student understanding.

Thoughts? Suggestions? Anyone done anything like this and want to share your experience/wisdom?

Monday, May 23, 2016

The Big Square Root Trick for Remembering the Unit Circle

I learned this "trick" at an APSI several years ago.  I know lots of people use the "hand trick", and I do teach that to my students, but I like this trick better because I can write it down on paper and "see" what I'm doing a little easier.  I taught it in Pre-Cal and I review it in AP Calculus.  I tell the students who take the AP Exam that the first thing they should do when they get their test is write this down.  If you combine it with a trick for remembering what's positive in each of the four quadrants of the unit circle, they can evaluate most any trig function on the test.

Drawing the Square Root:

Using the Square Root:


Friday, May 20, 2016

Trig T-Shirt Project

In the spirit of the last post, I wanted to share another one of my favorites from my trig unit.

When we are wrapping up transformations of trig graphs, I assign a t-shirt project to my students.  I love this project because it's easy to grade - they just stand in front of me and I check their work.  It's also great because the back of the shirt really lets them show their personality and sense of humor.  I'm always surprised by some of the stuff that they come up with as "reasons for studying trig"!  I could only find one example to share - not sure what I did with all the others I know I saved, and I know the scale on the x-axis in this example is a little off, but it still gives you an idea of what a finished product looks like.


What is a Radian?

I didn't get to teach Pre-Calculus this year, which was really rough because I LOVE Pre-Cal, especially all of the trig!  I was feeling nostalgic and thought I'd share an activity that I used at the very beginning of my trig unit.  This activity helps kids understand the concept of a radian.  And best of all, it involves CANDY which is the universal motivator!  Students use twizzlers as a measurement tool.  You need to use the pull up apart twizzlers, which can sometimes be a little hard to find, so make sure you don't wait until the last minute to get them!

What is a Radian Activity

Wednesday, May 18, 2016

Moving on Down the Line

One of my Calculus students' favorite lessons is the one I do to introduce particle motion.  It's actually an activity that I got several years ago at a training I went to at our regional educational service center.  It's called "Moving on Down the Line".

I ask for volunteers, but I don't tell them what they're volunteering for.  The first 5 volunteers get a secret instruction card that only they can look at.  The next 6 volunteers get data collection cards.  The last volunteer will be the timekeeper.  If you have enough students in your class you can make two groups and repeat the process for the second group.

I borrow a really long tape measure from the track coach - the kind they use to measure the long jump and triple jump.  We go out in the hallway and we roll out the tape measure.  Mover one goes to the starting point indicated on their card.  The timekeeper starts the timer and calls out the time as mover 1 follows the instructions on their card.  The first time is just a practice one so that the data collectors can figure out about where they need to be in order to record their data.  They measure where the movers back heel is at the times indicated on their card to the nearest foot.  Once the data collectors get an idea of where they need to be, the mover repeats their walk and we record the data.  We repeat this process for the other 4 movers.

We go back to the classroom and I give them the handouts where they will make tables and graphs for each mover.  We have the data collectors call out their information for each mover so we can all fill our tables out together.  Then the students create the graphs.

Once all of the graphs are made, we try and figure out what the secret instructions on each movers card was.  I ask questions like:

Where did they start?  How can you tell?
What direction(s) did they move?  How can you tell?
Did they ever stand still?  How can you tell?
Did they ever speed up?  Slow down?  How can you tell?
What was their displacement?  Total distance traveled?
Which mover moved fastest?  Slowest?

There are many other questions that naturally arise from the graphs, and it's interesting to see the kids come up with their own conclusions about the movement.

This activity leads right into the introduction to particle motion and all of the vocabulary associated with it.

There's an associated activity called "Moving with Technology" that uses a CBR/CBL and has the kids create graphs that meet certain criteria.

Monday, May 16, 2016

Creating GIFs to Show Learning

This past weekend I was fortunate enough to get to attend #TXGOO16 in Frisco, Texas.  It's the Techs4Tex Texas Summit featuring Google Apps for Education.  I attended six different sessions and learned so many amazing things that I can use in my classroom, but I wanted to share my FAVORITE thing - student created GIFs to show learning.

Here's a couple that I created:


It was so fun making these!  And you REALLY have to think through the problem step by step to make sure you show ALL your thinking in the GIF - I love thinking of the students having to go through that kind of thought process when making these!


I started by creating the images using Google Slides.  You just make your first slide that shows the problem, then duplicate the slide and show the first step.  You keep duplicating the slide and then making a change until you get to the end of the problem.  Then you download each slide as a jpeg.  I used gifmaker.me to create my GIFs - you just upload your jpegs in the order you want to them to appear in the GIF.  I set the animation speed on both of these to 1000 and then you just click the big "Create GIF Animation" button on the right hand side of the page.  Once the GIF is created, you'll see a link that says "Download GIF".  Voila!  I cannot wait to use this as an assessment tool next year!


Algebra I STAAR Review

Despite the best of intentions, I know I haven't blogged much in the last couple of years.  I'm hoping that is going to change going into next year.  But I thought I could try and get the ball rolling with my blogging again by sharing what I came up with for reviewing my Algebra I students for the STAAR test this year.

The first thing I did was teach my students the "Five STAAR Strategies".  On the day of the test, we gave each student a pencil with colored stickers on it to remind them of these strategies.  The first strategy was "Fix Your Formula Chart" which simply means for them to add a few useful things to the formula chart before they even begin answering questions on the test.  I gave them a "blank" copy of the formula chart to practice fixing every day at the start of class for the month leading up to the test.

Then I found this amazing website and immediately downloaded all of the worksheets.  I combined the worksheets for each Reporting Category into two files - one containing all of the Readiness Standards for that Reporting Category and one containing all of the Supporting Standards for that Reporting Category.  In case you aren't familiar with the blueprint for the Algebra I STAAR, the Readiness Standards make up 60-65% of the test, so we started with them.

Readiness Standards
RC 1
RC 2
RC 3
RC 4
RC 5

Supporting Standards
RC 1
RC 2
RC 3
RC 4
RC 5

I would work the problems on the worksheets out with my students together in class one day, and then have them complete a Quizizz containing similar problems the next day.  The problems on the worksheets came from the 2013 released STAAR and old TAKS tests.  The problems on each Quizizz came from the 2014 and 2015 released STAAR tests.  (I gave the kids a hard copy of the questions because some of the problems are hard to read on the Quizizz.)

RC 1 Quizizz - hard copy
RC 2 Quizizz - hard copy
RC 3 Part 1 Quizizz - hard copy
RC 3 Part 2 Quizizz - hard copy
RC 4 Quizizz - hard copy
RC 5 Quizizz - hard copy

We ended up not having time to do very many of the supporting standards, so I went through and picked out the ones I thought would be very easy for them to understand and remember, like independent/dependent, function/not a function, parent functions, and intercepts.

We won't get results until right before school is out, so I don't know how effective all of this was, but I really liked the structure of it.  There are SO MANY problems that can be worked using the "GRAPH" and "TABLE" features of the calculator, so I think it really helped for the students to see that and get practice doing it.

How do you review your students for your End of Course Exam?